Install and run jupyter-notebooks environment
1. Operating system
I am a big fan of reliability, so I prefer Debian GNU/Linux stable version, Trixie for now. So I can dive it into as deep as I like. Beautiful Python and its batterys of libraries are included already, actually it’s python version 3.15.5. Jupyter-notbook seems to be best for showing things, because of automatic syntax highlighting and it’s capabilities to produce html and pdf on choice. But it is not the simplest thing to get it running without complains. Follow the steps and enjoy.
2. Prerequisites
First step is creating a python virtual environment, which is quite usual for pythoniasts. It is especially useful for not destroying the OS packages and to have different packages and libraries just on your specific needs for a project. Of course you can have different virtual environments for different projects. For this special need, just to show how jupyter notbooks can be rung, I place one it into a new subdirectory in my $HOME:
    $ mkdir notebooks
    $ cd notebooks
    $ ls -a
    .  ..
    $ python -m venv .venv
    $
    $ ls -a
    .  ..  .venv
    $
    $ sudo apt install python3-pip
    ...
    $ source .venv/bin/activate
    (.venv) $
From the activate script we earn another shell prompt to show, where we are. Just do quick proof:
    (.venv) $ type python
    .../.venv/bin/python
    (.venv) $
Its the same python version as your OS carries. As pip is no longer part of the python3 Debian package, we need to install it from the Debian archive servers. It is needed to list all the needed python utilities we intend to use further on. It’s name is quite usual.
3. Possibly needed python packages
intending to write jupyter-notebooks I use a requirements.txt file containing all I need:
    (.venv) $ cat requirements.txt
    jupyter==1.1.1
    jupyter-console==6.6.3
    jupyter-events==0.12.1
    jupyter-lsp==2.3.1
    jupyter_builder==1.0.2
    jupyter_client==8.9.1
    jupyter_core==5.9.1
    jupyter_server==2.20.0
    jupyter_server_terminals==0.5.4
    jupyterlab==4.6.0
    jupyterlab_pygments==0.3.0
    jupyterlab_server==2.28.0
    jupyterlab_widgets==3.0.16
    matplotlib==3.11.0
    matplotlib-inline==0.2.2
    numpy==2.4.6
    scikit-rf==1.6.2
    (.venv) $
No problem if something is missing now, we can add missing packages later any time. Using pip it is also possible to remove packages.
3. Fetch listed python packages
Now it is time to fetch the listed packages from pypi.org.
Thats easy going inside the virtual environment:
    (.venv) $ pip install -r requirements.txt
    ...
    ...
    (.venv) $
4. Show the beauty of python
A quick check should follow. Just start the python interpreter.
(.venv) $ python
The python prompt ‘>>>’ is shown. Then you can type your command(s), they wil be executed line by line.
The Zen of Python, by Tim Peters

Beautiful is better than ugly.
Explicit is better than implicit.
Simple is better than complex.
Complex is better than complicated.
Flat is better than nested.
Sparse is better than dense.
Readability counts.
Special cases aren't special enough to break the rules.
Although practicality beats purity.
Errors should never pass silently.
Unless explicitly silenced.
In the face of ambiguity, refuse the temptation to guess.
There should be one-- and preferably only one --obvious way to do it.
Although that way may not be obvious at first unless you're Dutch.
Now is better than never.
Although never is often better than *right* now.
If the implementation is hard to explain, it's a bad idea.
If the implementation is easy to explain, it may be a good idea.
Namespaces are one honking great idea -- let's do more of those!
5. Run your first jupyter-notebook
Much documentation about this cool stuff you may find on the web.
One hint: https://jupyter-notebook.readthedocs.io/en/stable/
But perhaps you like to start over, so do it:
(.venv) $ jupyter-notebook
And soon an image like this should appear in your default browser.
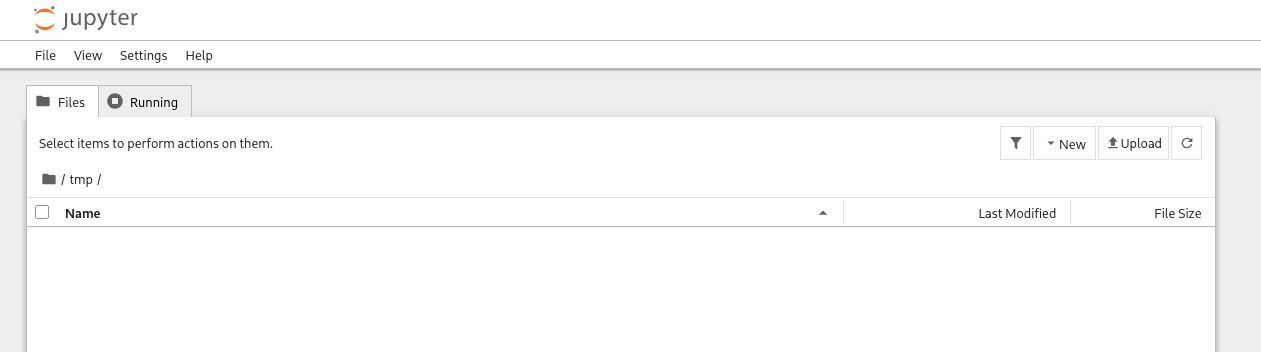
Your playground has started. It is getting time to play …
To lift off your first notebook just use your pointing device, then press
<File>,
<New>,
select the Notebook item,
choose a senseful name (for you it must be sensful),
and then enjoy the begin of a new journey to the unknown.
Have Fun!